前言
Mailu 是一个开源的邮件服务器套件,功能强大且易于部署。通常情况下,Mailu 需要直接部署在公网服务器上,以确保邮件的正常收发。然而,直接使用 VPS 部署 Mailu 可能会面临性能瓶颈(特别是内存瓶颈,对仅 1G 内存的 VPS 来说,Mailu 几乎是不可用的),尤其是在处理大量邮件时。 为了解决这个问题,我们可以利用 FRP(Fast Reverse Proxy)实现内网穿透,将 Mailu 部署在内网环境中,同时通过 VPS 作为中转,实现邮件的收发功能。
然而,对邮件发送的限制、对公网攻击的阻断等问题导致这一配置过程需要额外消息,因此本文将详细介绍如何通过 FRP 将内网的 Mailu 邮件服务器安全地暴露到公网 VPS 上。
准备工作
网络环境
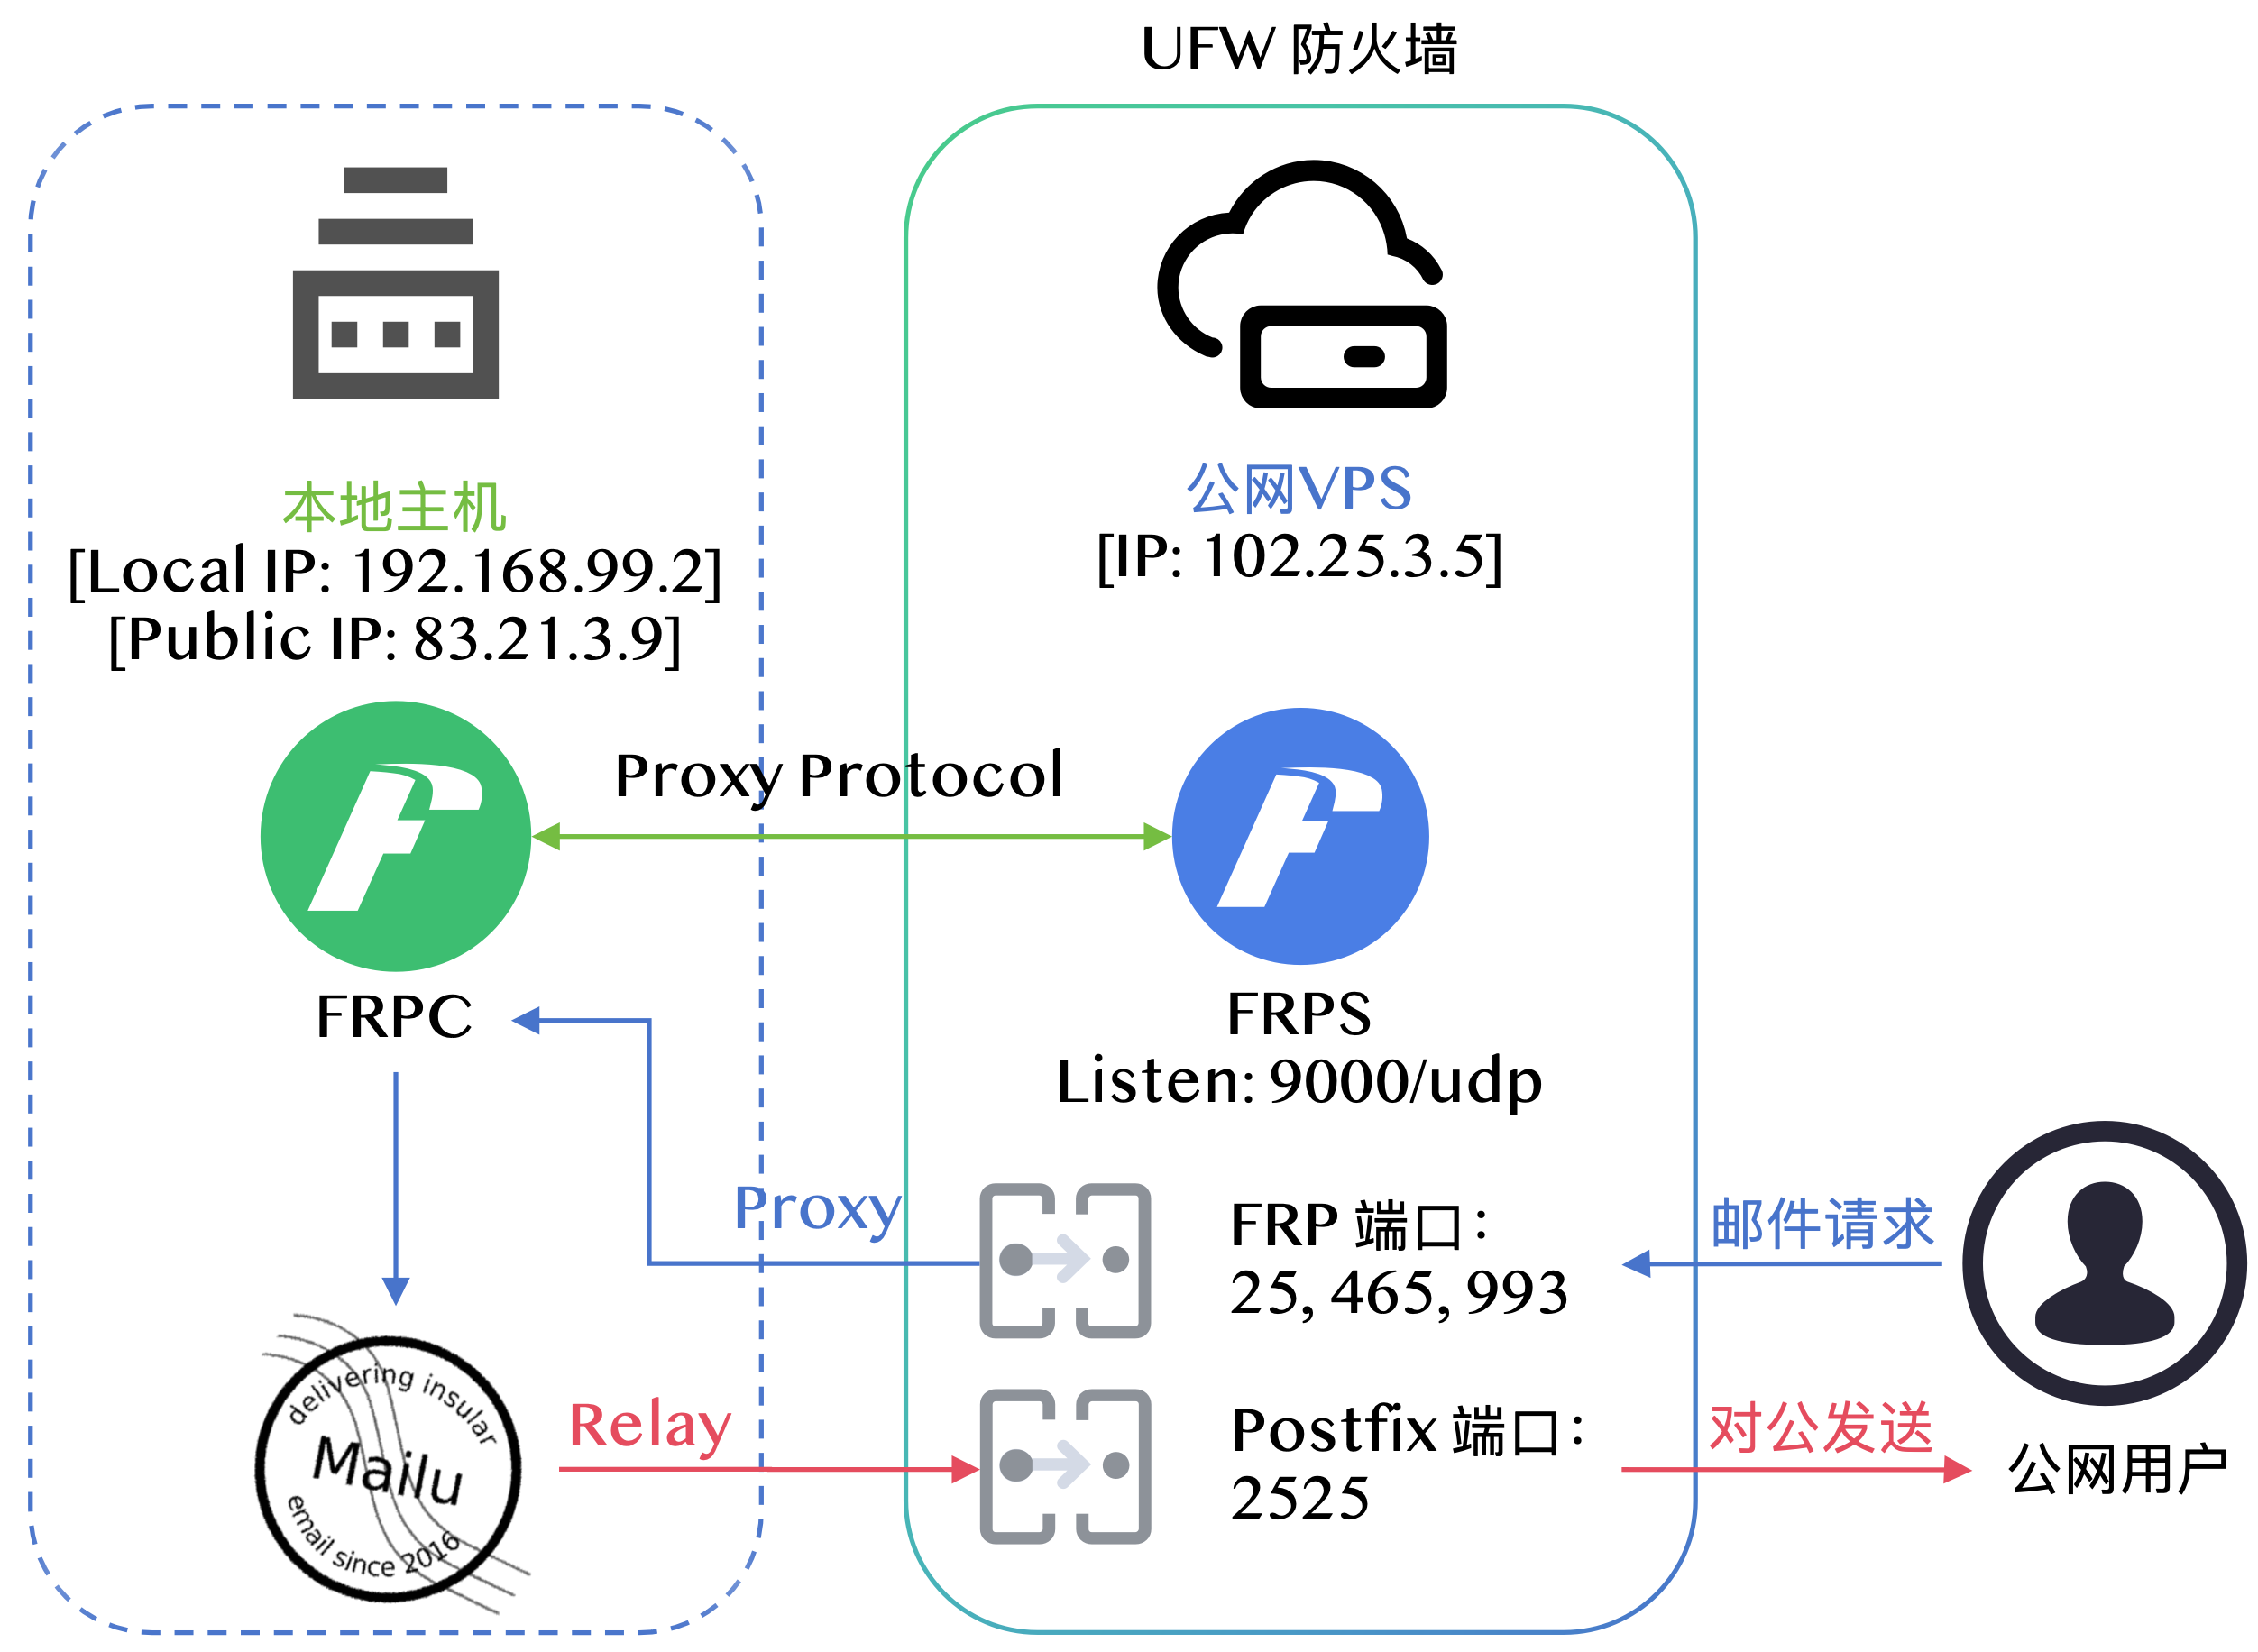
本文涉及到的网络部署环境如下图所示,其中公网 VPS IP 为 102.25.3.5,内网服务器 IP 为 192.168.99.2,内网服务器对外发送消息时候的公网 IP 为83.21.3.9。
FRP 配置
在 VPS 与内网服务器上分别部署 FRP,配置文件如下:
VPS 端(frps.toml)
 1
 2
 3
 4
 5
 6
 7
 8
 9
10
11
12
|
# bindPort = 7000 # 可不用,后文使用 quic 协议,如果 quic 不稳定,则可以启用
quicBindPort = 9000

# frpc 的授权保护
auth.method = "token"
auth.token = "2tw1Uimv0vksW2sTJGgq"  # 务必自行修改

webServer.addr = "127.0.0.1"
webServer.port = 7500
# dashboard 用户名密码,可选,默认为空
webServer.user = "ZYmQar3F"  # 务必自行修改
webServer.password = "8ZiDQJ9GpulZeC2mXcyT"  # 务必自行修改
|
内网服务器端(frpc.toml)
 1
 2
 3
 4
 5
 6
 7
 8
 9
10
11
12
13
14
15
16
17
18
19
20
21
22
23
24
25
26
27
28
29
30
31
32
33
34
35
36
37
38
|
serverAddr = "102.25.3.5"  # VPS 公网 IP
serverPort = 9000
auth.method = "token"
auth.token = "2tw1Uimv0vksW2sTJGgq"  # 务必自行修改并对应 frps
transport.protocol = "quic"

[[proxies]]
name = "http-servers"
type = "tcp"
localIP = "127.0.0.1"
localPort = 7443  # Mailu Web 管理界面端口
remotePort = 5555  # VPS 上的映射端口,可通过 Caddy 等反向代理访问
transport.useCompression = true

[[proxies]]
name = "smtp-25"
type = "tcp"
localIP = "127.0.0.1"
localPort = 10025
remotePort = 25
transport.proxyProtocolVersion = "v2"  # 关键配置,确保Mailu能正确获取访问请求中的公网 IP


[[proxies]]
name = "submission-465"
type = "tcp"
localIP = "127.0.0.1"
localPort = 10465
remotePort = 465
transport.proxyProtocolVersion = "v2"

[[proxies]]
name = "imaps-993"
type = "tcp"
localIP = "127.0.0.1"
localPort = 10993
remotePort = 993
transport.proxyProtocolVersion = "v2"
|
测试 FRP 配置是否正确,可以分别在 VPS 与内网服务器上启动 frps 与 frpc:
1
2
3
4
|
# 在 VPS 上启动 frps
frps -c /path/to/frps.toml
# 在内网服务器上启动 frpc
frpc -c /path/to/frpc.toml
|
如果一切配置正确,可以通过systemctl配置为服务并启动,参考[使用 systemd(frp 文档)]。
设置 UFW 防火墙规则(VPS主机)
在 VPS 上设置 UFW 防火墙规则,仅允许内网服务器的公网 IP 访问 FRP 服务端口:
1
2
3
4
5
6
|
sudo ufw allow from 83.21.3.9 to any port 9000 proto udp

# 允许邮件相关端口,确保 ufw 的默认策略是 deny
sudo ufw allow 25,465,993/tcp
sudo ufw reload  # 确保 ufw 此前已经正确配置,不会导致无法连接
sudo ufw status verbose
|
启动 FRP
分别通过 systemctl 配置启动 frps 与 frpc 服务,连接后确保对应端口已开始监听:
1
|
netstat -tulnp | grep frps # 通过 apt install net-tools 安装
|
应当看到有以下监听端口:
1
2
3
4
5
6
|
tcp6  0  0 :::465   :::*    LISTEN  16310/frps
tcp6  0  0 :::25    :::*    LISTEN  16310/frps
tcp6  0  0 :::993   :::*    LISTEN  16310/frps
tcp6  0  0 :::5555  :::*    LISTEN  16310/frps
tcp6  0  0 :::7000  :::*    LISTEN  16310/frps # 已基于 ufw 封禁,不会有安全隐患
udp6  0  0 :::9000  :::*    16310/frps
|
Mailu 配置(内网主机)
可以参考此前的【mailu邮件服务部署】文章来配置基本的 Mailu 邮件服务器,DNS 配置方面保持使用公网 IP 配置即可,其余的配置需要针对内网部署做出以下调整:
mailu.env 配置(内网主机)
 1
 2
 3
 4
 5
 6
 7
 8
 9
10
11
|
# Will relay all outgoing mails if configured
RELAYHOST=[102.25.3.5]:2525  # 将使用 VPS 作为内网主机的发件中转服务器
# 注意上面使用 [] 扩起来是为关闭检查,避免检查循环
OUTBOUND_TLS_LEVEL=encrypt  # 强制使用 TLS 加密连接确保中转安全

# 启用 PROXY Protocol 支持的端口列表,确保与 frpc 配置一致
PROXY_PROTOCOL=25,993,465

# IPs for nginx set_real_ip_from (CIDR list separated by commas)
REAL_IP_FROM=192.168.203.1/32
# Mailu 容器所在内网 IP 段,将与 frpc 结合获取真实 IP
|
docker-compose.yml 配置(内网主机)
注意到其中 25,465,993 端口映射到 127.0.0.1 下,这是为了获取真实 IP 所必须的。
 1
 2
 3
 4
 5
 6
 7
 8
 9
10
11
12
13
14
15
16
17
18
19
20
21
22
|
services:
  front:
    image: ${DOCKER_ORG:-ghcr.io/mailu}/${DOCKER_PREFIX:-}nginx:${MAILU_VERSION:-2024.06}
    restart: always
    env_file: mailu.env
    logging:
      driver: journald
      options:
        tag: mailu-front
    ports:
      # Mailu 在获取到 tls 证书后会自动跳转到 443 端口
      - "192.168.99.2:7443:443"  # 转发到 VPS 上的 5555 端口,可通过 Caddy 等反向代理访问
      - "192.168.99.2:7780:80"
      - "127.0.0.1:10025:25"  # 对应到 frpc 的 localPort
      - "127.0.0.1:10465:465"  # 对应到 frpc 的 localPort
      - "127.0.0.1:10993:993"  # 对应到 frpc 的 localPort
    networks:
      - default
      - webmail
    volumes:
      - "/opt/mailu/certs:/certs"
      - "/opt/mailu/overrides/nginx:/overrides:ro"
|
配置发件(内网主机)
为避免内网主机与 VPS 邮件通信时出现相同 hostname 的问题,在内网主机当中设定配置 Mailu 的 postfix 服务。
在内网主机的 $MAILU_ROOT/overrides/postfix/ 路径下创建文件 postfix.cf 来替换关键配置:
1
2
|
# $MAILU_ROOT/overrides/postfix/postfix.cf
smtp_helo_name = mailu-sender.local
|
中转发件服务器配置(VPS 主机)
在 VPS 主机上安装 postfix 作为中转发件服务器:
1
|
sudo apt install postfix
|
在配置过程中选择 “Internet with smarthost”。
Postfix 配置(VPS 主机)
过滤在消息体中出现的内网主机的公网 IP
创建 /etc/postfix/header_checks 文件,添加以下配置:
1
|
/^Received:.*\[83\.21\.3\.9\].*/ IGNORE
|
该配置用于过滤掉内网主机的公网 IP,避免隐私泄露问题,仅暴露 VPS 的公网 IP。
修改 Postfix 主配置文件
编辑 /etc/postfix/main.cf,添加或修改以下配置:
 1
 2
 3
 4
 5
 6
 7
 8
 9
10
11
12
13
14
15
16
17
18
|
# /etc/postfix/main.cf

# 借用 Caddy 生成的证书,确保路径正确,如果没有Caddy保持原样即可,也同样可以加密
smtpd_tls_cert_file=/var/lib/caddy/.local/share/caddy/certificates/acme-v02.api.letsencrypt.org-directory/mail.hlmg.tech/mail.hlmg.tech.crt
smtpd_tls_key_file=/var/lib/caddy/.local/share/caddy/certificates/acme-v02.api.letsencrypt.org-directory/mail.hlmg.tech/mail.hlmg.tech.key
smtpd_tls_security_level=encrypt  # 将原本的 may 改为强制 encrypt

myhostname = smtp.hlmg.tech  # 确保与 VPS 的 DNS 记录一致,用于 spf 验证
# 一般来说跟内网主机 Mailu 上面配置的 hostname 可以不一致(比如内网设置为 mail.hlmg.tech)

mydestination = $myhostname, localhost.localdomain, localhost

# ⚠️⚠️⚠️ 下面的配置非常重要 ⚠️⚠️⚠️
mynetworks = 127.0.0.1/32 83.21.3.9/32  # 仅允许内网主机的公网 IP 访问
# 上面这个 IP 如果不加限制会导致任何人都能通过你的 VPS 发送邮件,进而被滥用发送垃圾邮件

# 在末尾添加过滤配置
header_checks = regexp:/etc/postfix/header_checks
|
修改 Postfix 监听端口
编辑 /etc/postfix/master.cf,修改以下配置:
1
2
3
4
|
# /etc/postfix/master.cf
# smtp      inet  n       -       y       -       -       smtpd
2525    inet    n       -       y       -       -       smtpd
# 将 smtp 端口改为 2525 端口,避免与 frps 开放的 25 端口冲突
|
应用配置并检查测试
重启 postfix 服务:
1
2
3
4
5
6
7
8
|
sudo systemctl restart postfix

# 检查2525端口是否正确监听
sudo netstat -tulnp | grep 2525

# 开放 ufw 防火墙端口
sudo ufw allow from 83.21.3.9 to any port 2525 proto tcp # 仅允许内网主机的公网 IP 访问
sudo ufw reload
|
到目前为止,已经可以正常进行收发邮件了🎉,启动 mailu(local), frpc(local), frps(vps), postfix(vps) 即可可以使用邮件客户端执行测试,测试中注意通过查看完整消息体检查是否还有内网主机的公网 IP 被记录。
Fail2ban 配置(IPv4/6 双栈防护 + 内网主机 + VPS 主机联动)
现在的配置是没有攻击阻断的,即爆破攻击没有限制,接下来我们通过在内网主机配置 fail2ban 检查攻击,然后通过自动化联动在公网主机配置 iptables 阻断攻击。
在内网主机上安装 fail2ban:
1
|
sudo apt install fail2ban
|
内网主机 fail2ban 配置
过滤器配置(内网主机)
在 /etc/fail2ban/filter.d/mailu-bad-auth-bots.conf 创建过滤器:
1
2
3
4
5
6
7
8
|
# /etc/fail2ban/filter.d/mailu-bad-auth-bots.conf
# Fail2Ban configuration file for mailu-front log file
[Definition]
failregex = ^.* mailu-front\[\d+\]: .* Info: Disconnected: Connection closed:.*user=<>, rip=<HOST>,.*$
            ^.* mailu-front\[\d+\]: .* client login failed: \"AUTH not supported\" while in http auth state, client: <HOST>, server: .*$

ignoreregex =
journalmatch = CONTAINER_TAG=mailu-front
|
Jail 配置(内网主机)
在 /etc/fail2ban/jail.d/mailu-bad-auth-bots.conf 创建 jail:
 1
 2
 3
 4
 5
 6
 7
 8
 9
10
|
# /etc/fail2ban/jail.d/mailu-bad-auth-bots.conf
[mailu-bad-auth-bots]
enabled = true
backend = systemd
filter = mailu-bad-auth-bots
bantime = 604800
findtime = 8000
maxretry = 3
action = mailu-sync-vps
ignoreip = 83.21.3.9/24  # 内网主机的公网 IP 段,避免误封
|
联动脚本配置(内网主机)
在 /etc/fail2ban/action.d/mailu-sync-vps.conf 创建 action:
1
2
3
4
5
6
7
8
|
# /etc/fail2ban/action.d/mailu-sync-vps.conf
[Definition]

actionstart = /opt/fail2ban-sync/mailu-sync-to-vps.sh init
actionstop = /opt/fail2ban-sync/mailu-sync-to-vps.sh flush

actionban = /opt/fail2ban-sync/mailu-sync-to-vps.sh ban <ip>
actionunban = /opt/fail2ban-sync/mailu-sync-to-vps.sh unban <ip>
|
其中涉及到的脚本 mailu-sync-to-vps.sh 需要自行创建,并放在自己设定好的位置上,其原理是通过 ssh 执行 iptables 阻断,其内容如下:
 1
 2
 3
 4
 5
 6
 7
 8
 9
10
11
12
13
14
15
16
17
18
19
20
21
22
23
24
25
26
27
28
29
30
31
32
33
34
35
36
37
38
39
40
41
42
43
44
45
46
47
48
49
50
51
52
53
54
55
56
57
58
59
60
61
62
63
64
65
66
67
68
69
70
71
72
73
74
75
76
77
|
#!/bin/bash
# /opt/fail2ban-sync/sync-to-vps.sh
MX_HOST_1="xg"
MX_HOST_2="zt" # VPS 主机(可有多个)的主机名或 IP 地址,需在 sshd 配置中允许免密登录
IPSET_NAME_V4="f2b-bad-auth-bots-v4"
IPSET_NAME_V6="f2b-bad-auth-bots-v6" # ipv6 ipset 名称

# 判断 IP 版本
get_ip_version() {
    if [[ "$1" =~ : ]]; then
        echo "6"
    else
        echo "4"
    fi
}

case "$1" in
    ban)
        IP_VERSION=$(get_ip_version "$2")
        if [ "$IP_VERSION" = "6" ]; then
            ssh $MX_HOST_1 "ipset add -exist $IPSET_NAME_V6 $2"
            ssh $MX_HOST_2 "ipset add -exist $IPSET_NAME_V6 $2"
        else
            ssh $MX_HOST_1 "ipset add -exist $IPSET_NAME_V4 $2"
            ssh $MX_HOST_2 "ipset add -exist $IPSET_NAME_V4 $2"
        fi
        ;;
    unban)
        IP_VERSION=$(get_ip_version "$2")
        if [ "$IP_VERSION" = "6" ]; then
            ssh $MX_HOST_1 "ipset del -exist $IPSET_NAME_V6 $2"
            ssh $MX_HOST_2 "ipset del -exist $IPSET_NAME_V6 $2"
        else
            ssh $MX_HOST_1 "ipset del -exist $IPSET_NAME_V4 $2"
            ssh $MX_HOST_2 "ipset del -exist $IPSET_NAME_V4 $2"
        fi
        ;;
    init)
        for HOST in $MX_HOST_1 $MX_HOST_2; do
            ssh $HOST "
                # 创建 IPv4 ipset
                ipset create $IPSET_NAME_V4 hash:net family inet -exist
                # 创建 IPv6 ipset
                ipset create $IPSET_NAME_V6 hash:net family inet6 -exist

                # IPv4 iptables 规则
                iptables -I INPUT -p tcp --dport 25 -m set --match-set $IPSET_NAME_V4 src -j DROP 2>/dev/null || true
                iptables -I INPUT -p tcp --dport 465 -m set --match-set $IPSET_NAME_V4 src -j DROP 2>/dev/null || true
                iptables -I INPUT -p tcp --dport 993 -m set --match-set $IPSET_NAME_V4 src -j DROP 2>/dev/null || true

                # IPv6 ip6tables 规则
                ip6tables -I INPUT -p tcp --dport 25 -m set --match-set $IPSET_NAME_V6 src -j DROP 2>/dev/null || true
                ip6tables -I INPUT -p tcp --dport 465 -m set --match-set $IPSET_NAME_V6 src -j DROP 2>/dev/null || true
                ip6tables -I INPUT -p tcp --dport 993 -m set --match-set $IPSET_NAME_V6 src -j DROP 2>/dev/null || true
            "
        done
        ;;
    flush)
        for HOST in $MX_HOST_1 $MX_HOST_2; do
            ssh $HOST "
                # 删除 IPv4 规则
                iptables -D INPUT -p tcp --dport 25 -m set --match-set $IPSET_NAME_V4 src -j DROP 2>/dev/null || true
                iptables -D INPUT -p tcp --dport 465 -m set --match-set $IPSET_NAME_V4 src -j DROP 2>/dev/null || true
                iptables -D INPUT -p tcp --dport 993 -m set --match-set $IPSET_NAME_V4 src -j DROP 2>/dev/null || true

                # 删除 IPv6 规则
                ip6tables -D INPUT -p tcp --dport 25 -m set --match-set $IPSET_NAME_V6 src -j DROP 2>/dev/null || true
                ip6tables -D INPUT -p tcp --dport 465 -m set --match-set $IPSET_NAME_V6 src -j DROP 2>/dev/null || true
                ip6tables -D INPUT -p tcp --dport 993 -m set --match-set $IPSET_NAME_V6 src -j DROP 2>/dev/null || true

                # 销毁 ipset
                ipset destroy $IPSET_NAME_V4 2>/dev/null || true
                ipset destroy $IPSET_NAME_V6 2>/dev/null || true
            "
        done
        ;;
esac
|
确保脚本有执行权限:
1
|
sudo chmod +x /opt/fail2ban-sync/mailu-sync-to-vps.sh
|
执行测试,来验证脚本可以正常在 VPS 上创建阻断的 iptables 规则:
 1
 2
 3
 4
 5
 6
 7
 8
 9
10
11
12
13
14
15
16
17
18
19
20
21
22
23
24
25
26
27
28
29
30
31
32
33
|
# 首先在 VPS 上安装 iptables 与 ipset
sudo apt install iptables ipset -y

# 下面是测试流程---------------------------------------------

# 在内网主机上调用,对 VPS 执行初始化
/opt/fail2ban-sync/mailu-sync-to-vps.sh init

# 在 VPS 上查看 iptables 规则
sudo iptables -L -n | grep f2b-bad-auth-bots
sudo ipset list  # 查看 ipset 列表是否正确创建
-----------------------------------------------------------

# 在内网主机上调用,对 VPS 执行封禁
/opt/fail2ban-sync/mailu-sync-to-vps.sh ban 1.2.3.4

# 在 VPS 上查看 ipset 列表是否正确添加
sudo ipset list
-----------------------------------------------------------

# 在内网主机上调用,对 VPS 执行解封
/opt/fail2ban-sync/mailu-sync-to-vps.sh unban 1.2.3.4

# 在 VPS 上查看 ipset 列表是否正确删除
sudo ipset list
-----------------------------------------------------------

# 在内网主机上调用,对 VPS 执行清理
/opt/fail2ban-sync/mailu-sync-to-vps.sh flush

# 在 VPS 上查看 iptables 规则与 ipset 列表是否正确删除
sudo iptables -L -n | grep f2b-bad-auth-bots
sudo ipset list
|
如果一切正确,则重启内网主机上的 fail2ban 服务:
1
|
sudo systemctl restart fail2ban
|
如果一切顺利,这时候在 VPS 上应该已经创建好空的 iptables 规则与 ipset 列表,等待内网主机的 fail2ban 进行联动阻断。
1
2
|
sudo iptables -L -n | grep f2b-bad-auth-bots
sudo ipset list
|
检查
最后,检查 ufw 防火墙规则,确保只允许内网主机的公网 IP 访问 FRP 与邮件端口:
1
|
sudo ufw status verbose
|
应当看到类似如下的规则:
 1
 2
 3
 4
 5
 6
 7
 8
 9
10
11
12
13
14
15
|
Status: active
Logging: on (low)
Default: deny (incoming), allow (outgoing), deny (routed)
New profiles: skip

To                         Action      From
--                         ------      ----
9000/udp                   ALLOW IN    83.21.3.9
2525/tcp                   ALLOW IN    83.21.3.9
80,443/tcp                 ALLOW IN    Anywhere
25,465,993/tcp             ALLOW IN    Anywhere
443/udp                    ALLOW IN    Anywhere
80,443/tcp (v6)            ALLOW IN    Anywhere (v6)
25,465,993/tcp (v6)        ALLOW IN    Anywhere (v6)
443/udp (v6)               ALLOW IN    Anywhere (v6)
|
观察攻击阻断能力
在正式部署之前,最好先观察一段时间,确保 fail2ban 能够正确识别攻击并通过联动脚本在 VPS 上阻断攻击。
可以通过查看内网主机的 fail2ban 结果来确认是否有攻击被识别:
1
|
sudo fail2ban-client status mailu-bad-auth-bots
|
如果有攻击被识别,在 VPS 上检查相关的 iptables 规则与 ipset 列表,确认攻击 IP 是否被正确阻断:
1
2
|
sudo iptables -L -n | grep f2b-bad-auth-bots
sudo ipset list
|
如果一切顺利,至此内网穿透的 Mailu 邮件服务器部署完成,并且具备了基本的攻击阻断能力。可以开始使用邮件客户端进行收发邮件的测试。
结语
邮件服务器的使用通常面临大量的攻击,特别是暴力破解攻击。通过将 Mailu 部署在内网环境中,并利用 FRP 实现内网穿透,可以有效减少对 VPS 性能的依赖。同时,结合 fail2ban 与 iptables 的联动,可以增强邮件服务器的安全性,阻断恶意攻击,确保邮件服务的稳定运行。
